How to drive 200K+ traffic to your blog from Pinterest
(This post contains affiliate links. You can read my full disclosure here.)
When it comes to driving traffic to your blog, there are numerous ways to do it. There are so many social media websites out there that you will often get confused which one to choose from when you are starting out with your blog. Well, this is what happened to me.
A few places from where you can drive traffic or other bloggers are driving traffic.
- Tumblr
- Google Plus
- Stumbleupon
- Google Search (Organic Search)
Choosing the best source of traffic for your blog depends on a few factors.
How old is your blog?
If it’s quite new, then you would probably not think about Google Search or Organic traffic to your blog. Its one of the toughest one to get as it would take you a long time (For most of the bloggers) to get a decent traffic from Google.
How much time you have?
Generally, when you are starting out your blog, you don’t have a lot of time to be everywhere on the internet. It’s for the obvious reason, it’s time-consuming.
But I know it can be too tempting to be a part if not all then as many social media websites as possible. This is the mistake I also did and I don’t want you to repeat that.
Its very simple, if you try to be everywhere, you just end up being nowhere!
So how should you choose the traffic source for your blog? Why is Pinterest the best traffic source for your blog?
- Pinterest traffic is free! You don’t pay for it, not a single penny! Its true, trust me.
- You have an insane reach out. Pinterest is used by more than 100million people worldwide. It means you have a huge exposure to your blog.
- It’s easy to make your blog post viral on Pinterest. Pinterest has something called as repins. The more your pin (blog post) gets pinned the more viral you get.
- Pinterest users spend a lot. Most of the users on Pinterest browse pins with an intention and motivation of buying something. This means you are sitting right in front of your audience.
- Pinterest is easy to automate. It means you don’t have to spend all your time publishing pins to your Pinterest account. You can simply automate that and concentrate on building awesome content for your blog.
- Pins on Pinterest are evergreen. It’s not like a post on Facebook or any other social media platform. The more time your pins stay on Pinterest, the more it drives traffic to your website. Pins simply never die!
It’s not just what other bloggers say, in fact, I have witnessed the same as well with my blog. If you have been reading my income reports you would find that more than 90% of the traffic I get is from Pinterest. Also, it’s because of the evergreen nature of pins on Pinterest, I continue to see an increase in traffic from my viral content on Pinterest.
I must say Pinterest is the only platform in the world which can give you the best return on your investment whether its time or money. So its time that you dominate Pinterest for your own blog.
Get this recipe/post delivered to your inbox 📩
Busy right now? I’ll send this straight to your inbox so it’s waiting for you later. Read it anytime — no searching for it again.
A lot has changed over the period of time. Pinterest has grown many folds over the years and has added a lot of features to its core. All of them helps bloggers like you and me to leverage Pinterest for promoting our content and build our business in the easiest possible way.
Before we dive deep into how to set up your Pinterest account, let’s see if Pinterest is for everyone.
Pinterest offers you a wide set of users belonging to different interest groups. Let me list down a few here.
- Hair and Beauty
- Food
- DIY
- Lifestyle
- Clothing and Fashion
- Health and fitness
- Blogging
- Arts and Creativity
- Parenting
- Home Decor and Improvement
- And a lot more …
I think Pinterest is great if most of your readers are women. This is true because about 70% of users on Pinterest are women.
If you belong to a niche where most of your readers are mostly men, then I think you should try some other platform apart from Pinterest to drive traffic to your website. It’s not that Pinterest won’t work for you, but I think your time will be well spent on other platforms and not Pinterest.
Before we go ahead, a few words about Facebook and other platforms alike.
- It’s too tough to build your traffic from Facebook, simply because of your reach is very limited.
- The posts you create on Facebook are not evergreen. In fact, the average life of a post on Facebook is around 5hrs only.
- You will have to spend dollars to get your post in front of other people. Also, this does not guarantee traffic though!
- Most famous videos or posts on facebook are cat videos and memes, so you building something incredibly awesome will get buried under those memes which get so many likes and shares (this is sad, I know!).
Steps to drive insane traffic to your blog from Pinterest
1. Create your Pinterest Account
First thing first, you should create your Pinterest account. It’s insanely easy to get this step done. Just visit the Pinterest homepage and register using your email address and password. You can also register directly using Google or Facebook.
Once done, Pinterest will ask you to follow some topics and categories. This is mostly towards building your Pinterest profile. I highly recommend that you follow only those topics which align directly with your blog niche.
2. Complete your Pinterest profile
Next, you need to complete your Pinterest profile.
Here is how it would look like.

A few information that you need to fill in and are important are
- Your Business name
- Your profile picture
- Your Pinterest username
- About you
- Your website.
You can change your Pinterest username but you need to pick something that has not been used already. Always try to put your business name in your Pinterest username if possible.
While filling your “About You” section make sure that it makes complete sense for a reader to understand what your business does. Write a short description of what you do and who do you help. Also, try to add some searchable keywords while building this description.
Location information is optional, you can leave it blank if you want to.
3. Verify your website
One more information that you need to fill in is your “Website”. This is very important.
Just enter your website URL here and click the confirm button. This gives a popup with some information like this.
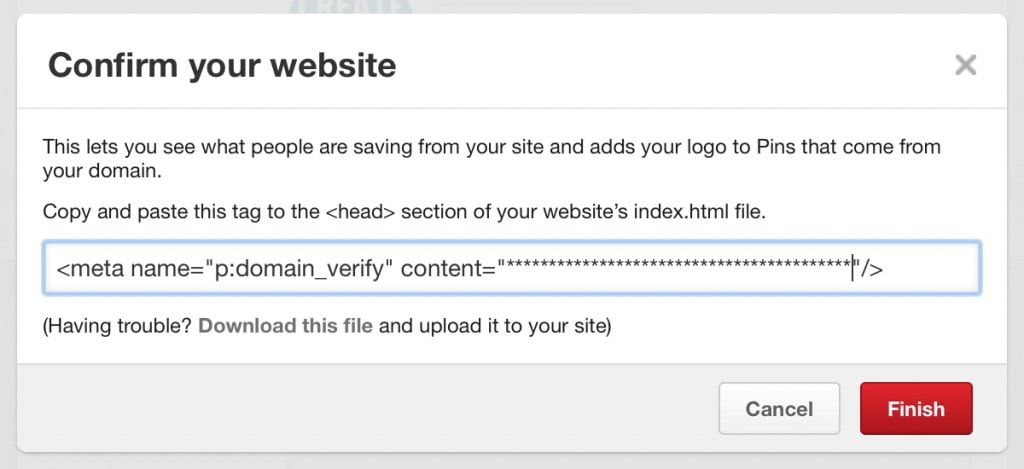
The code displayed in the popup will be used for confirming your website. Now you can ask someone with the knowledge of coding to help you out with this, or pay someone to do it for you. Another smart way is to use a plugin.
Make sure that you copy this text from the popup.
In WordPress, there is a plugin known as Yoast SEO plugin. Yoast SEO plugin adds a lot of benefits to boost your website SEO ranking. You can also use this plugin to verify your website for Pinterest as well.
Follow these steps to confirm your website
1. Go to your WordPress dashboard and hover over the “SEO” tab on the left sidebar. Then click on “Social”. You will see a page like this.
2. Next click on the Pinterest tab which opens a screen like this.
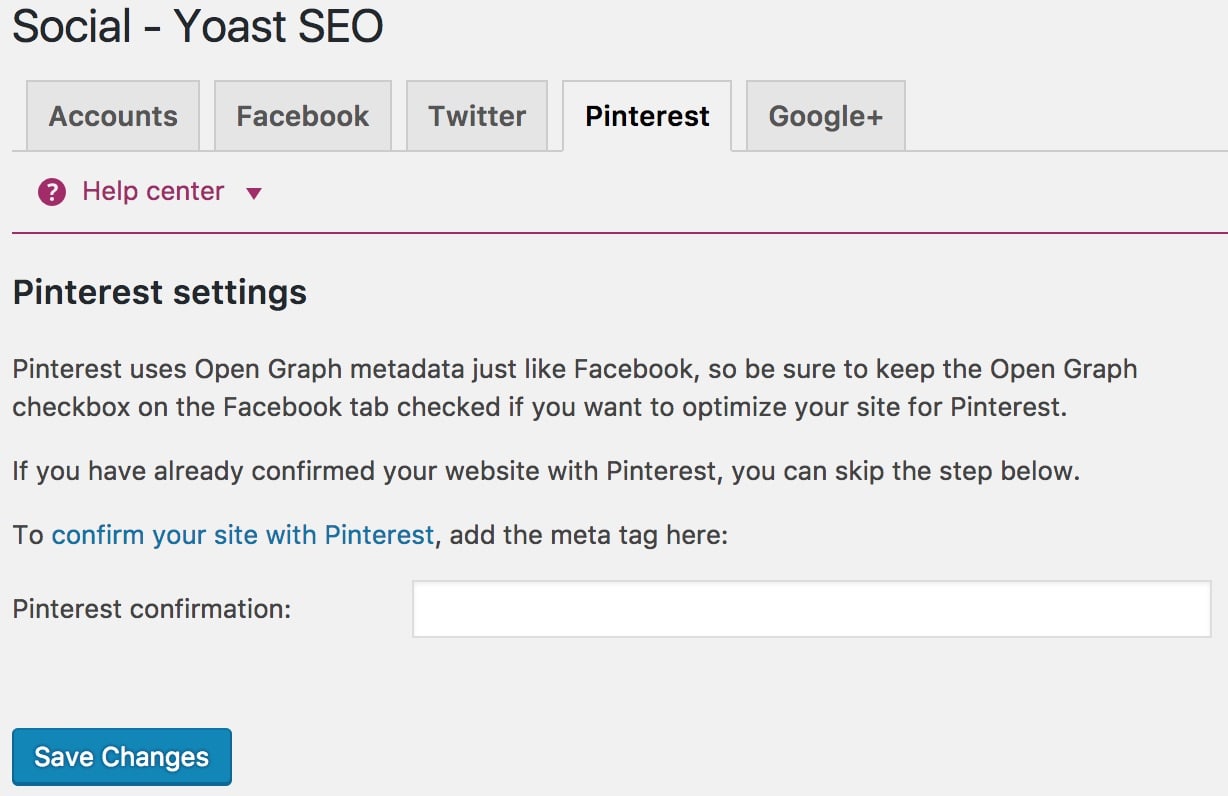
3. Next, paste the text you copied from Pinterest website confirmation popup.
4. Click on “Save Changes”.
5. Next go back to your Pinterest and click “Finish” button.
It might take some time for Pinterest to confirm your website. Once done you will see a “Site Confirmed” badge in your Pinterest profile settings page.
4. Apply for Pinterest Rich Pins
This is a very crucial step in building traffic to your blog from Pinterest. Enabling rich pins makes your pins to stand out and also helps Pinterest to recognize that you are serious about your business. It makes Pinterest recognizes you and trusts you.
Pinterest rich pins help you to boost your reach and engagement. It means more users will be seeing and interacting with your pins which means more traffic to your blog.
The process might take some time as you will have to add a lot of tags on your blog. This will require you to take help from a coder or you can just use a simple plugin for this.
In WordPress, you can use Yoast SEO plugin again for this.
Just go to your WordPress dashboard and under SEO then Social, click on facebook this time. Make sure that “Add Open Graph Meta Data” is “enabled”.

Now you might ask what you need to enable this option under “Facebook” tab. Well, this is how it is. You just need to add those required tags. The same tags are used by Facebook as well. So it does not matter from where you enable it you just need to add them so that Facebook, as well as Pinterest, can use it.
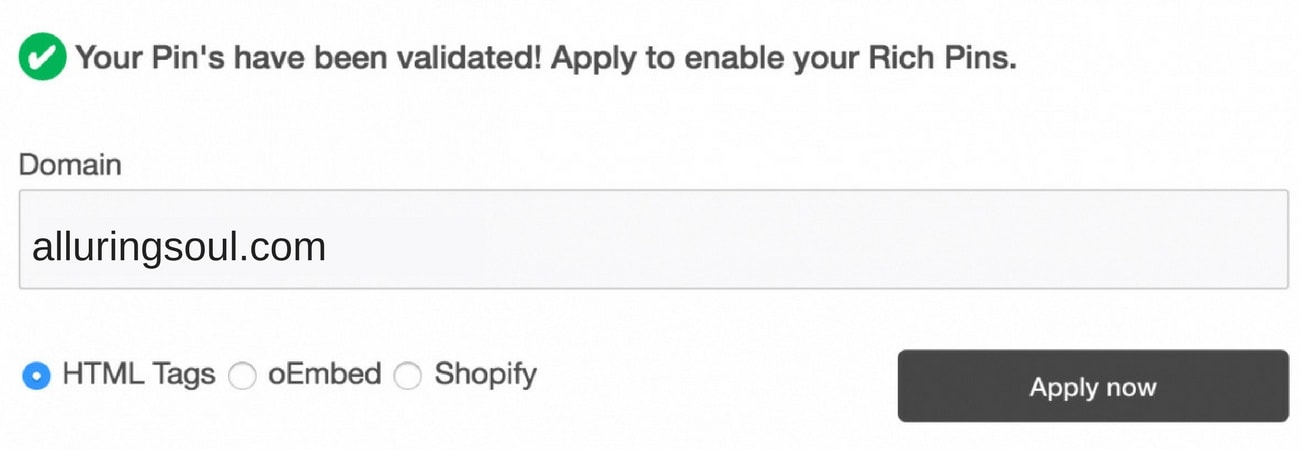
Next, you need to validate your website. You can do it by visiting the Pinterest Rich Pins Validator and pasting the URL of any post from your blog.

You will see a notification message saying your pin has been validated. Just click on “Apply Now” button to enable rich pins on your Pinterest profile.
You will get an email from Pinterest on whether your profile is approved or not within 24 hours.
5. Create your own Pinterest Boards
You should create a few Pinterest boards for your Pinterest profiles. Why did you ask, its because it gives a sense to someone visiting your Pinterest profile what expertise you have. Always create boards which match your niche.
A few points to remember/follow while creating your boards.
- Don’t make your board names cute, try to make it easy to search on Pinterest. For example, if you are in beauty niche, then you can create a board with name Skin Care Tips or Hair Care Tips. You can also try to be more specific on the name like Smoothies for Aging Skin.
- Create around 10 boards related to your niche. This is required before you can see any follower or traffic to your blog. It will show your readers that you are real and not a robot just trying to get more followers.
- Make sure you add board descriptions as well to your boards. These should also be searchable. You can choose from what people search on Pinterest to create your board description.
- Make sure to at least 10 pins on each of your boards.
6. Add your own pins and pins of others
One big mistake almost every new blogger does on Pinterest is promoting only their own pins on Pinterest. This is bad. Pinterest does not like this. You should promote others great pins as well. Pinterest likes you to be a content aggregator for your readers. So you should always aggregate the best content on Pinterest so that your readers feel engaged and interested. Don’t be just me, be a team player.
So once you are done creating your boards, you should start pinning your own and others pins on those boards.
However there is no exact ratio in which you should do this, I try to be around 1:6 on this. This means for every 1 of my own pins, I put 6 pins from others bloggers on my boards.
7. Follow the best people in your niche
Next step should be to follow the best players in your niche.
Also, you can selectively follow only a few of the boards of someone’s profile. This is better as compared to following someone’s profile as then you will be following all of their boards, which is not quite useful to your niche.
Following them will create a tonne of value for your profile.
Your Pinterest home feed will show more relevant and the best pins from the best players in your niche. This means pinning the best pins to your board becomes a lot easier, you can do it directly from your Pinterest feed.
It also means you will be getting a lot of ideas about what else you can do in your niche. Most of the times you might feel stuck after a while in your niche. Following others will help you.
As the popular people in your niche are already writing about a certain topic and they are getting a lot of repins and traffic from it, it means you should also be successful with that topic as well.
8. Learn Canva and create beautiful and engaging pins
Most of the bloggers are not artists or photoshop genius. This does not mean they can not produce engaging and clickable pins for Pinterest.
Canva is a tool which helps bloggers like me and you (if you are not a photoshop expert!) to create beautiful pins. Its quite easy to use and you can find a lot of tutorials on how to get started online.
Canva has a lot of templates which are either free or you pay a very small amount to use them (Most of them are free to use and they are great!). The templates are great for starters as well as professionals.
Canva is free to use. Although they do have a paid version where you get a lot of other features, I think you can use it for free when you are starting out. I use it for free.
9. Always create vertical pins
Always create vertical pins on Pinterest. This is kind of defacto on Pinterest. If your pins are vertical, they are bound to get more repins and clicks as compared to horizontal pins. You can check Pinterest and find for yourself.
The pin sizes I use ranges from 735 px (Width) X 1102 px (Height) to 735 px (Widht) X 2000 px (height).
Anything smaller than this might harm your pin repin and click rate. Try to stick to this size range and you are safe!.
You can use Canva to create your own custom size pins by clicking on “Custom Dimensions” button on the top right of your Canva homepage.
10. Stay active on your Pinterest profile
Always make sure that you stay active on your Pinterest profile. This does not mean to just keep pinning anything. Make sure that you only pin quality pins which your readers will like.
Also, try to pin at least 30 pins every day when you are starting out. You can reduce this rate later when you are established.
The more you pin, the more your account gets established in your niche. Also, more people see your pins in their Pinterest feed which means more repins, followers and visitors to your blog.
Also, make sure that you pin when your readers are more likely to see your pins. This depends largely on from where your major chunk of readers belongs to. If they are from the US then pinning at 5 AM in the morning (US local time) is obviously a mistake as most of your readers will be sleeping and they won’t be seeing your pins on their feed.
11. Join Group Boards
Once you are done putting your Pinterest profile in place, its time to join group boards.
Group boards are like your normal Pinterest boards, but the difference is, in group boards, there are a lot of collaborators while in your own boards, you are the only one pinning.
Group boards have a lot number of followers as compared to your own boards. If you get added to a group board of let’s say 100,000 followers (this is quite normal for a group board!) then you pin potential reach is 100,000 people. You can understand how big of an impact this can make for your Pinterest game!.
This is invaluable when your account has less than 1000 followers and you are struggling for your pins to be seen by others.
The best way to find the group boards matching your niche is through pingroupie.
Pingroupie is a free to use website which provides a way to search for group boards on the basis of the number of followers, topics, repin rate and a more.
Always select the group boards which have more number of followers than your own account. Otherwise, it will be just a waste. Although you can select a board with fewer followers but make sure that it has a high engagement rate (repin rate).
You can find about the engagement rate of a board in Tailwind.
You can start with their 14-day free trial here.
Once you found the group board, you would like to contribute to, its time to join it.
Create an email asking the board owner to join their group board. Make sure that you have a link to your Pinterest profile in the email.
For finding the email address of the group board owner you can try one of these.
You can check the description of group board and find if they have an email address in the description. A lot of group boards have this.
You can also check if the group board owner has a website or blog linked to their Pinterest profile. You should be able to find their email id on their website’s contact page.
Once you have joined a group board, make sure that you only post great content on them. Also, read the description of group board on how many times you can pin in a day. Make sure you adhere to those or else you will be removed from the board by the owner.
You can schedule pins to these group boards using Tailwind.
Again, you can start with their 14-day free trial here.
12. Use a sharing plugin on your blog
This is an important step and should not be neglected. You want more people to share your posts on their social media profiles especially on Pinterest as this will add to the virality of your pin.
You can use any sharing plugin to do it but I recommend to use AddThis share plugin. Its too easy to setup and also you get a lot of social media accounts to choose from for your readers to share. Plus its completely free to use.
Also another great and must have feature is the analytics that AddThis gives to you. You would know what content is getting maximum shares and how many of them are bringing you traffic.
This is it, my friend. I hope you liked the post. Now its time to start implementing these and grow your traffic from Pinterest. If you have any doubts, just comment on this post or email me. I will love to reply to those.
Hi Mamta,
Thanks for this informative article. Do you post to group boards at any time or a specific time? If so how do I find out this time? Also how many of your own pins do you post to these boards per day. Does it change over the weekend?
Thanks
Sara
Hi Sara, I post on group boards when chances of my readers being online are high. Also, it depends on what kind of readers you have on your blog. As most of the traffic I get is from the US I pin mostly around 9 PM EST. That’s the time I get maximum traffic on my website as well. I would recommend you to find the time at which your users are online mostly from your google analytics page.
I post around 3-4 pins of my own on these boards. When you are starting out you can pin more as well. Also, make sure you read the description of group boards as most of them have a restriction on the number of times you can pin on them.
I try to keep my pinning activity same during the weekend as well. You should use Tailwind to schedule your pins. This will save you a lot of headaches.
Hope I answered your questions. Do let me know if you have any other doubts.
Thanks
Mamta
Hi Mamta, I really enjoyed your post. It contained so much information about Pinterest that I wish I’d known about from the start. So thanks for the info.
Thanks, Rose.
Such a great article. It’s really helpful for me to generate more traffic on the website through Pinterest. Thank you.